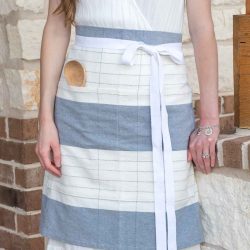
DIY Flour Sack Towel Waist Apron
Learn how to easily sew a flour sack towel waist apron. This simple and beautiful DIY half apron makes a wonderful handmade gift.
Equipment
- sewing machine
- iron
- soft measuring tape, yard stick, or acrylic ruler
- fabric scissors
- pins
- pinking shears (optional)
- serger (optional)
Materials
- 2 flour sack towels (1 if not adding a pocket)
- 3 yards 1" cotton twill ribbon
- thread
Instructions
- Wash, dry, and iron flour sack towels and cotton twill ribbon.
For the straps:
- Measure and cut out two strips of the cotton twill ribbon at 50″ long.
- I used pinking shears when cutting the twill ribbon since it can fray easily.
- Sew a zigzag stitch on each raw end to prevent fraying. You can also use a serger instead.
- On one end of each strap, fold over 1/2″ and iron flat. Then fold over another 1/2″ and iron flat again to get your finished edge.
- Straight stitch about 1/8″ away from the edge of the folded hem. Don’t forget to forward and back stitch to secure the stitch. Repeat on the other strap.
- 1″ of the strap length will be inserted into the top hem of the main piece. Finished length of the straps are 48″ each.
For the main piece:
- The flour sack towel originally measures 30″ x 30″.
- Fold what you determine to be the top of the towel over 1.25″ and iron flat. Pin the hem in place.
- Measuring from the folded top of the apron to the bottom – cut at the 23″ mark. If you have not yet folded over and ironed the 1.25″ seam at the top, measure down and cut at the 24.25″ mark.
- Make the bottom hem by folding over the cut edge 1/2″ and iron flat. Then fold over another 1/2″ and iron flat again to create the hemline. Pin the hem in place.
- Straight stitch about 1/8″ away from the edge of the folded bottom hem. Don’t forget to forward and back stitch to secure the stitch.
- Insert 1″ in length of the unfinished edges of each strap into the 1.25″ fold of the main piece top hem on both ends. Pin straps into the fold of the hem.
- Straight stitch about 1/8″ away from the edge of the top hem. Don’t forget to forward and back stitch to secure the stitch.
- I chose to do a bit of a decorative stitch pattern at each strap for a cute detail in addition to added durability. I incorporated this pattern while sewing the top hemline, not separately.
- Using the straight stitch, sew a 1″ x 1″ box with a “X” in the middle. Refer to picture for a more clear explanation.
- Finished measurements of the flour sack towel are 30″ wide x 22″ long.
For the pocket:
- With a second flour sack towel, cut a 19” x 12.5” piece of fabric where needed to achieve the desired pattern.
- Depending on the pattern of fabric, such as the ivory and green stripe one used, I chose to do a more narrow pocket at 15” x 12.5” to be able to get two pocket pieces out of one towel.
- Fold the top edge of the pocket over 1/2″ and iron flat. Then fold over another 1/2″ and iron flat again to create the hem. Pin and sew the top hem.
- Optional: zigzag stitch or serge around the raw edges on the sides and bottom of pocket.
- Fold the sides and bottom of the pocket over 1/4 – 1/2″ and iron flat.
- With the unfinished edges folded under, pin the pocket in place onto the main apron piece and sew around the three sides.
- Optional: Depending on the width of the pocket, sew a straight stitch down the middle of the pocket to create two pockets. I recommend putting the apron on at this point to figure out if one or two pockets feels most natural and works best.