DIY Woodland Nursery Curtains
Learn how to easily make DIY woodland nursery curtains. Perfect for any nursery with the optimal balance between light filtering and blackout curtains.
Equipment
- sewing machine
- fabric scissors
- measuring tape
- pins
- iron
Materials
- flannel fabric (the amount needed for the desired height and number of panels)
- drop cloth
- bear applique (template available on blog post)
- vanishing marking pen
- paper
- thread
Optional Supplies:
- Cricut machine
- machine mat
- Cricut Design Space
Instructions
Measure and Cut Fabric
- Begin by laundering and ironing all fabric to be used for the curtains.
- All measurements stated in this tutorial are based off of the fabric width and custom length (44″ x 92″). Simply add or subtract some fabric to either the drop cloth or flannel portion to get the length that works for your space.
- Measure and cut 81″ panels from the main fabric – I used flannel.
- Measure and cut 44″ x 15″ pieces from the drop cloth. You will only need one for each curtain panel.
- Iron all of the fabric pieces to be used. Next, fold over the top 3″ of the drop cloth and iron down. This is going to create the rod loop for the curtains.
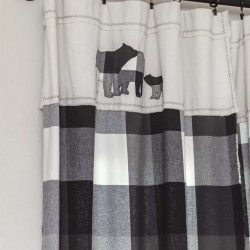
Bear Applique
- There are two ways to cut out your bear applique stencils: print and cut the pattern from the computer or cut a pattern using a Cricut. Need help setting up the file in Cricut Design Space? Check out my tutorial on how to do so on my blog post - DIY Heart Garland.
- Once you have the bear patterns cut out of paper, lay them on the leftovers of your main fabric, trace the pattern with a vanishing marking pen, and cut out one of each bear for each curtain panel.
- Pin the bears onto the drop cloth and stitch around each using the overcasting stitch on your machine. I recommend doing a test stitch to see what size stitch width and length you like for this application.
Sew the Main Piece
- Instead of a true hem, I chose to leave frayed edges around the curtains.
- Using the straight stitch, sew 1/4″ from the edges around the main fabric. Slightly fray the fabric all around.
Sew the Header
- Pin the top of the main fabric to the bottom of the drop cloth on the backside with a 1″ overlap.
- Drop cloth has a tendency to fray easier than other fabrics. Because of this, I elected to sew 1/2″ away from the edges to allow for any excess fraying to take place.
- Using a decorative stitch and a contrasting thread color, sew 1/2″ from the edges around the drop cloth. Again, I recommend doing a test stitch to see what size stitch width and length you like for this application.
- My decorative stitching is 1/4″ wide with the outer edge being 1/2″ away from the edge of the drop cloth.
- Make sure to sew along the bottom of the rod pocket (3″ fold over) and not the top edge. Slightly fray the fabric all around.
- Use clip rings or the rod pocket to hang your beautiful new curtains.